
What is Vernier Caliper?
A Vernier caliper is a precise measuring instrument used in various fields for accurate linear measurements. It consists of a main scale and a sliding Vernier scale, which allows measurements to be taken with greater precision than a simple ruler. By aligning the scales, you can determine the measurement down to the smallest unit on the Vernier scale, enabling measurements of both internal and external dimensions with high accuracy.
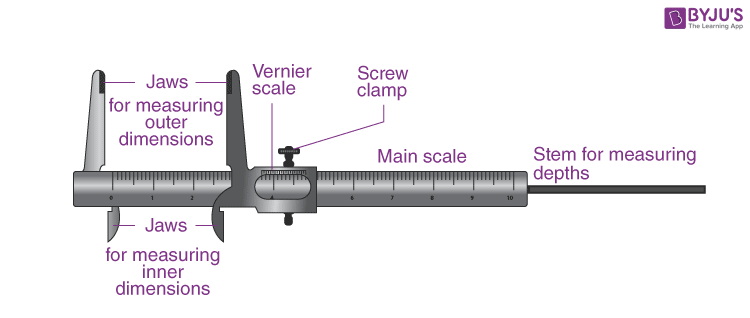
Part Detail with Diagram

A Vernier caliper consists of several components that facilitate accurate measurements. Here’s an explanation of its main parts –
- Main Scale: This is the longer, fixed scale that runs along the length of the caliper. It is usually graduated in millimeters (mm) or inches (inches) and serves as the primary scale for reading measurements.
- Jaws: The jaws of the Vernier caliper are used to hold the object being measured. There are two sets of jaws: the larger ones for external measurements and the smaller ones for internal measurements.
- Depth Gauge: A small rod or extension attached to the Vernier caliper allows for measuring the depth of holes or grooves. This depth gauge is useful for various applications, such as determining the depth of a drilled hole.
- Vernier Scale: The Vernier scale is a movable scale that slides along the main scale. It is slightly shorter than the main scale and is divided into smaller divisions, which are more numerous than the divisions on the main scale.
- Vernier Slider: The Vernier slider holds the Vernier scale and can be moved along the main scale. It is connected to the main body of the caliper and has a locking screw to secure it in place once a measurement is set.
- Main Scale Reading: To read the main scale, you look at the aligned main scale marking that is closest to the zero mark of the Vernier scale.
- Vernier Scale Reading: To get the precise measurement, you identify the Vernier scale division that lines up best with a division on the main scale. The Vernier scale reading is usually given by the aligned Vernier division, which corresponds to a fraction of the smallest division on the main scale.
- Locking Screw: Once you’ve set the measurement, you can secure the Vernier slider in place using the locking screw. This ensures that the measurement remains accurate until you release the lock.
- Thumb Screw: The thumb screw on a Vernier caliper is used to control the movement of the Vernier slider. When turned, the thumb screw either loosens or tightens, allowing the slider to move smoothly along the main scale. Once the desired measurement is set, the screw is tightened to secure the slider in place for accurate readings.
By aligning the scales and observing where the divisions match, you can accurately read measurements using a Vernier caliper. The Vernier scale provides finer resolution than the main scale, allowing measurements to be taken with a higher degree of precision.
Working Principle
The working principle of a Vernier caliper is based on the Vernier scale, which provides finer measurement resolution than the main scale. As the Vernier slider is moved along the main scale, its Vernier scale divisions align with the main scale divisions. When both the scales are perfectly aligned, a zero error is achieved. To measure an object, close the jaws around it and slide the Vernier scale until it touches the object. The aligned Vernier division indicates the fraction of a main scale division, which is then added to the main scale reading. This allows precise measurements with high accuracy, beyond what a regular scale can achieve.
Least Count
The least count of a Vernier caliper is the smallest measurement that can be read or displayed by the instrument. It’s determined by the difference between one main scale division divided by Total No. of Vernier scale division.
Least Count (LC) = Value of one Main Scale Division / Total No. of Vernier scale division.
Let’s say the Vernier caliper has a main scale graduated in millimeters (mm) and the Vernier scale has 50 divisions. The length of one main scale division is 1 mm.
Main Scale 1 Division Value = 1 mm
Total No. of Vernier Scale Division 50
= 1 mm / 50 = 0.02 mm
Least Count (LC) of Vernier Caliper = 0.02mm

What is Zero Error?
Zero error in a Vernier caliper refers to the measurement error that occurs when the caliper’s jaws are closed and the Vernier scale is not perfectly aligned with the zero mark on the main scale. It can result in an incorrect measurement if not properly accounted for. It is mainly two types –

- Positive Zero Error: If the zero on the Vernier scale is to the right of the zero on the main scale when the jaws are closed, it indicates a positive zero error. This means that the caliper reads a value greater than the actual measurement.
- Negative Zero Error: If the zero on the Vernier scale is to the left of the zero on the main scale when the jaws are closed, it indicates a negative zero error. This means that the caliper reads a value less than the actual measurement.
To ensure accurate measurements, the zero error should be determined by comparing the caliper readings with a known reference object, and this error value should be added to or subtracted from subsequent measurements, as applicable.
Types
There are a few types of Vernier calipers designed for specific measurement needs. Here are some notable ones –
Standard Vernier
This is the basic design with both an external and internal set of jaws for measuring outside and inside dimensions, respectively. It’s widely used in various applications requiring precision measurements.

Dial Vernier
Instead of a Vernier scale, it has a dial gauge that directly displays measurements. This type is often preferred for ease of reading, especially in situations where direct Vernier scale interpretation might be challenging.

Digital Vernier
It features a digital display that provides measurements in digital form. This type offers quick and easy readings, eliminating the need for manual Vernier scale interpretation. It’s commonly used in industries where rapid measurements are essential.

Depth Vernier
This variant includes a depth rod that extends from the base of the caliper. It’s used to measure the depth of holes, slots, or other recesses.

Height Vernier
It combines a Vernier caliper with a height gauge, allowing measurements of both external dimensions and heights in a single tool. This type is beneficial for measuring the height of objects and steps.

Metric and Inch Vernier
Vernier calipers can come in either metric (millimeters) or inch versions. They are designed to measure in the respective units, catering to different measurement systems.
Each type of Vernier caliper is tailored to specific measurement scenarios, offering different advantages. The choice depends on the required precision, ease of use, and the nature of measurements to be taken.
Maker
Certainly, here is a list of some well-known manufacturers and brands of Vernier calipers –
- Mitutoyo
- Starrett
- Fowler High Precision
- Brown & Sharpe
- TESA
- Moore & Wright
- Sylvac
- Bowers Group
- INSIZE
- SPI (Swiss Precision Instruments)
- Mahr
- Helios-Preisser
- Etalon
- Starett
- Hilti
- Groz
- Gedore
- Elcometer
Please note that this list is not exhaustive, and there are many more manufacturers producing Vernier calipers and other precision measurement tools.
Applications
Vernier calipers are versatile precision instruments with numerous applications across various industries. Here are some common applications:
- Engineering and Manufacturing: Used to measure dimensions of mechanical components, ensuring accuracy in production processes.
- Metalworking: Essential for precision machining, allowing measurement of tolerances and dimensions of metal parts.
- Woodworking: Used to take accurate measurements for carpentry and woodworking projects.
- Automotive Industry: Used to measure various automotive components, ensuring proper fit and alignment.
- Aerospace Industry: Critical for precise measurements in aircraft and spacecraft components to meet strict safety standards.
- Research and Development: Utilized for prototype measurements and fine-tuning experimental setups.
- Quality Control and Inspection: Ensures that manufactured parts adhere to specified dimensions and tolerances.
- Educational Institutions: Commonly used in laboratories to teach measurement concepts and practice precision.
- Jewelry Making: Used to measure gemstones, metals, and settings with high accuracy.
- Medical Field: Can be used in medical devices and prosthetics manufacturing for precise measurements.
- Architecture: Helps architects and builders take accurate measurements for construction and renovation projects.
- Electronics: Used for measuring small components and ensuring precise fits in electronic assemblies.
- Plumbing: Useful for measuring pipe diameters and fittings in plumbing applications.
- Automated Production: Integrated into automated systems for in-line measurements during manufacturing.
- Art Conservation: Used to measure and restore delicate artworks and artifacts.
- Instrumentation: For calibration of other measuring instruments and devices.
These applications showcase the versatility and importance of Vernier calipers in ensuring accuracy and quality across a wide range of industries and disciplines.
Limitations
While Vernier calipers are valuable tools for accurate measurements, they do have some limitations:
- Human Error: Incorrect alignment of scales, parallax errors while reading, and mishandling can lead to measurement inaccuracies.
- Limited Range: Vernier calipers have a limited measuring range compared to other tools like micrometers or height gauges.
- Limited Resolution: Vernier scales have a fixed number of divisions, limiting their precision compared to digital instruments.
- Fragility: They can be delicate and susceptible to damage if dropped or mishandled.
- Cumbersome for Quick Measurements: In situations requiring rapid measurements, Vernier calipers might be slower to use than digital tools.
- Interpretation Complexity: Reading Vernier scales accurately requires training and practice, which can be a challenge for beginners.
- Temperature Effects: Changes in temperature can affect the accuracy of metal Vernier calipers due to thermal expansion.
- Limited Depth Measurements: While depth gauges exist, Vernier calipers might not be as suitable as dedicated depth measurement tools.
- Material Compatibility: Certain materials, like very soft or delicate surfaces, might be challenging to measure without affecting the material.
- Complex Shapes: Measuring irregular or complex shapes might be difficult due to the caliper’s rigid jaws.
- Limited Accessibility: It might be challenging to use Vernier calipers in confined spaces or hard-to-reach areas.
Despite these limitations, Vernier calipers remain valuable tools for various precision measurement tasks, especially when used by skilled operators who understand their capabilities and limitations.
Advantages
Vernier calipers offer several advantages in precise measurements. They provide higher accuracy than standard rulers due to their Vernier scale, enabling measurements down to a fraction of a millimeter or inch. They are versatile, measuring both external and internal dimensions, making them essential in various industries like manufacturing, engineering, and woodworking. Vernier calipers are cost-effective compared to some digital alternatives. They don’t require power sources, ensuring reliability in various environments. Their durability allows for long-term use when handled carefully. Moreover, they serve as educational tools, teaching users about measurement concepts and improving manual dexterity for precise readings.
FAQ’s
Why is Vernier Caliper more accurate?
Vernier calipers are more accurate due to their Vernier scale, which divides the smallest main scale division into smaller increments. This finer scale allows for precise alignment between the Vernier and main scales, enabling readings down to a fraction of the smallest scale division. This high-resolution alignment reduces parallax errors and enhances measurement accuracy compared to traditional rulers, which lack such fine divisions.
How to read the depth using Vernier Caliper?
Certainly, here’s a step-by-step guide on how to read the depth using a Vernier caliper –
Prepare the Vernier Caliper: Make sure the caliper is clean and functioning properly. Check that the depth rod is free from debris or obstructions.
Open the Jaws: Gently open the jaws of the Vernier caliper by sliding the slider away from the main scale. This will allow you to insert the depth rod into the hole or slot you want to measure.
Insert the Depth Rod: Insert the depth rod into the hole or slot until it reaches the bottom. Ensure that the rod is aligned vertically and rests firmly against the bottom surface.
Close the Jaws: Carefully close the jaws of the Vernier caliper by sliding the slider towards the main scale. The depth rod will move upwards as the jaws close.
Read the Measurement: Look at the Vernier scale and identify the Vernier division that lines up best with a main scale division. This aligned Vernier division provides the depth measurement.
Main Scale Reading: Note the main scale reading from the point where the zero on the Vernier scale aligns with the main scale.
Vernier Scale Reading: Determine the Vernier scale division that lines up with a main scale division. This provides the additional fraction to add to the main scale reading.
Calculate the Depth: Add the main scale reading to the aligned Vernier scale division, considering the Vernier’s least count. This gives you the precise depth measurement.
Remember to consider any zero error and ensure that the Vernier caliper is properly aligned for accurate readings.
What is the difference between Manual & Digital Vernier Caliper?
Certainly, here’s a point-by-point comparison between manual and digital Vernier calipers –
Manual Vernier Caliper
Readability: Requires careful visual alignment of Vernier and main scales, which can be challenging for some users due to parallax errors.
Measurement: Measurements are read and interpreted manually from Vernier and main scales.
Accuracy: Accurate readings depend on the user’s skill in alignment and interpretation. Higher chance of human error.
Resolution: Limited by the number of divisions on the Vernier scale, which can lead to lower measurement precision.
Ease of Use: Requires training and practice to read accurately. Beginners might find it difficult.
Cost: Generally more cost-effective compared to digital calipers.
Digital Vernier Caliper
Readability: Provides digital readout directly, eliminating the need for visual alignment and reducing parallax errors.
Measurement: Measurements are displayed digitally on an easy-to-read LCD screen.
Accuracy: High accuracy due to digital measurement display, reducing chances of human error in interpretation.
Resolution: Offers finer resolution as digital displays can show measurements down to decimal places.
Ease of Use: User-friendly, no need for manual interpretation, suitable for both beginners and experienced users.
Features: Can have additional features like data output, preset values, and easy conversion between units.
Battery: Requires power source (usually a battery) for operation.
Both manual and digital Vernier calipers have their own advantages and drawbacks, with the digital version excelling in accuracy, ease of use, and ease of interpretation, while the manual version offers simplicity and cost-effectiveness. The choice depends on the user’s needs, skill level, and the level of precision required for the measurement tasks.
How to use Vernier Caliper?
Using a Vernier caliper accurately involves several steps. Here’s a detailed guide:
Familiarize Yourself with the Caliper: Familiarize yourself with the different parts of the Vernier caliper, including the main scale, Vernier scale, jaws, depth rod (if present), and locking screw.
Ensure Proper Calibration: Before use, ensure the caliper is properly calibrated and free from dirt or debris that might affect measurements.
External Measurement: To measure an external dimension (e.g., the length of an object):
Open the jaws of the caliper.
Place the object between the jaws, making sure it’s snugly held.
Gently close the jaws around the object.
Read the Measurement:
Look at the main scale to the left of the zero mark on the Vernier scale.
Find the main scale division that aligns with a division on the Vernier scale.
Note down this main scale reading.
Read the Vernier Scale:
Identify the Vernier scale division on the Vernier scale that aligns best with a division on the main scale.
Note the value of this aligned Vernier division.
Calculate the Measurement:
Add the main scale reading to the aligned Vernier scale division.
This sum, along with the Vernier’s least count, gives you the accurate measurement.
Internal Measurement: To measure an internal dimension (e.g., the inner diameter of a hole):
Use the smaller set of jaws for internal measurements.
Place the jaws inside the hole, and gently expand them until they touch the walls.
Depth Measurement (if applicable): To measure depth:
Insert the depth rod into the hole or slot being measured.
Close the jaws and gently lower the depth rod until it touches the bottom.
Read the depth measurement from the Vernier scale aligned with the main scale.
Lock the Caliper: If necessary, lock the Vernier slider in place using the locking screw to maintain the measurement setting.
Record the Measurement: Record the measurement value with its appropriate unit (mm or inches).
Zero Error Correction: If there’s a zero error (positive or negative), adjust subsequent measurements accordingly.
Remember, practice improves accuracy. Initially, take extra care in reading scales and avoiding parallax errors. With experience, using a Vernier caliper becomes more intuitive and precise.