Introduction
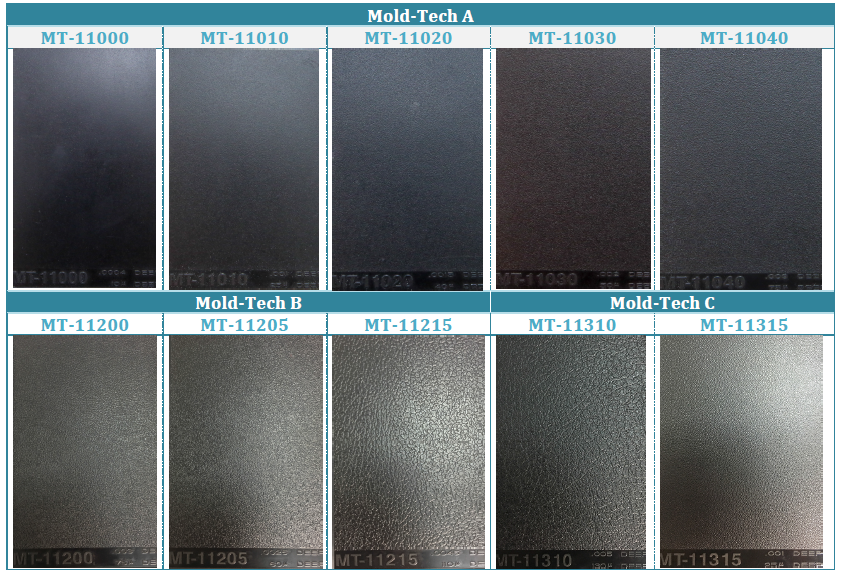
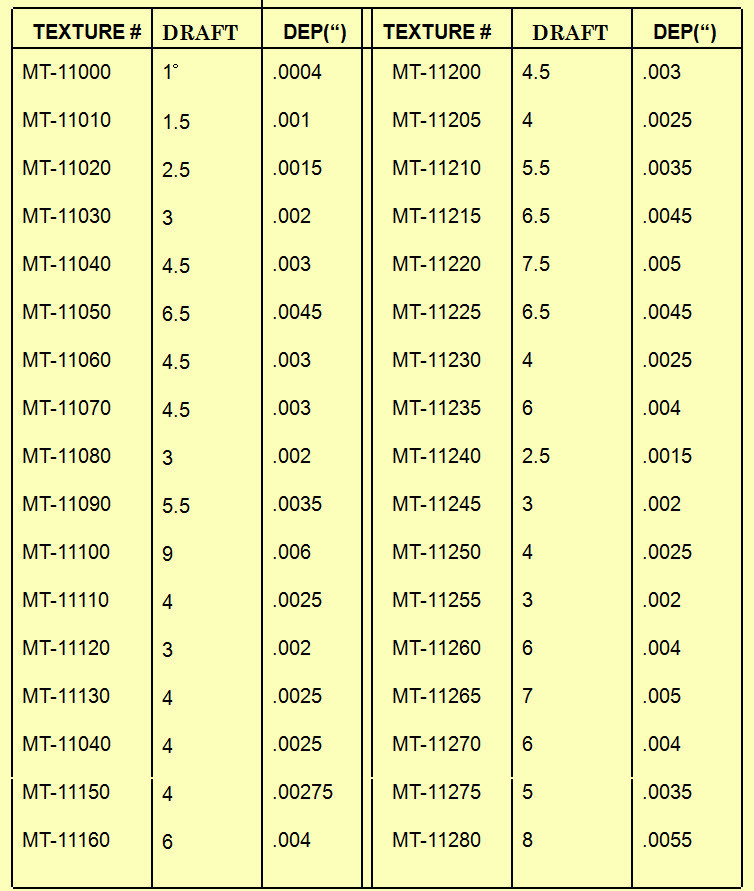
Injection molding is a versatile and widely used manufacturing process that allows for producing intricate plastic parts with high precision and efficiency. One critical aspect of injection molding that often goes unnoticed but plays a crucial role in the final product’s appearance and functionality is mold texturing. Mold texturing refers to the surface finish or texture applied to the mold cavity, which is then transferred to the molded part during the injection molding. In this article, we will delve into the different types of mold textures used in injection molding, their applications, and their impact on the final product.
The Importance of Mold Textures

Mold textures are not just about aesthetics; they serve various essential functions in injection molding –
- Aesthetic Appeal: Mold textures enhance the visual appeal of plastic parts. They can mimic natural materials like wood or leather or provide a sleek, glossy finish.
- Functional Characteristics: The texture of a mold can influence the part’s functionality. For example, textures can improve grip, reduce friction, or control light diffusion.
- Hiding Imperfections: Textured surfaces can hide minor imperfections and defects that may occur during the molding process, such as flow lines, weld lines, or ejector pin marks.
- Consistency: Mold textures help maintain consistency in the appearance and quality of molded parts, crucial for industries like automotive and electronics.
Now, let’s explore the different types of mold textures commonly used in injection molding:
1. High-Gloss Finish Mold Textures
A high-gloss finish is characterized by a smooth and shiny surface. It’s often used for products where aesthetics are paramount, such as consumer electronics, automotive interiors, and cosmetic packaging. Achieving a high-gloss finish requires a polished mold cavity and the use of high-quality, optically clear plastics.
2. Matte Finish Mold Textures
A matte finish, also known as a non-gloss finish, has a low sheen and a slightly rough texture. It’s a popular choice for products like household appliances, where a sleek appearance is desired without excessive reflectivity. Achieving a matte finish involves the use of matte-finish resins and a textured mold cavity.
3. Leather Grain Mold Textures
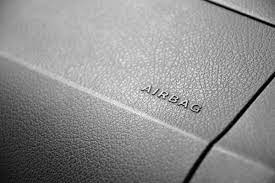
Leather grain textures simulate the look and feel of genuine leather. These textures are commonly used in automotive interiors, furniture, and fashion accessories. Achieving a convincing leather grain texture involves the use of textured mold inserts or secondary operations like embossing.
4. Wood Grain Mold Textures
Wood grain textures replicate the natural patterns found in various types of wood. They are frequently employed in the production of consumer goods, furniture, and building materials. Wood grain textures require specialized molds or secondary processes like hot stamping.
5. Peened Finish Mold Textures
A peened finish features a surface that looks as though it has been subtly hammered or peened. This texture is often chosen for its anti-glare properties and is utilized in products like outdoor signage, instrument panels, and displays.
6. Stone Texture Mold Textures
Stone textures mimic the appearance of various stone surfaces, such as granite or marble. They are commonly used in architectural and decorative applications, as well as in the production of countertops, tiles, and garden ornaments. Achieving a realistic stone texture may involve using textured molds or applying coatings post-molding.
7. Ribbed or Knurled Finish Mold Textures
Ribbed or knurled textures provide enhanced grip and are frequently used in the design of handles, grips, and ergonomic surfaces for tools, equipment, and consumer products. Achieving these textures may involve incorporating specialized inserts into the mold.
8. Custom Textures Mold Textures
In addition to the standard textures mentioned above, custom textures are tailored to specific product requirements. These textures can range from intricate patterns to company logos or unique designs. Custom textures are often used to differentiate products in competitive markets or to align with a brand’s identity.
Factors Influencing Texture Selection

The choice of mold textures depends on several factors –
- Product Functionality: Consider how the texture will affect the part’s functionality. For instance, a high-gloss finish might not be suitable for a grip surface, but it could be perfect for a smartphone cover.
- Aesthetics: Think about the visual appeal of the product. Different textures can evoke different emotions and perceptions. For example, matte finishes are often associated with a modern, high-tech look.
- Material Selection: The type of plastic resin used can influence the texture. Some materials are better suited for specific textures than others. It’s crucial to choose materials that can replicate the desired texture effectively.
- Manufacturability: Assess whether the chosen texture is feasible to produce with the selected molding process and equipment. Some textures may require more complex mold designs or secondary operations.
- Cost Considerations: Custom textures and complex textures can add to the overall production cost. Balancing the desired texture with budget constraints is essential.
- Regulatory Requirements: In industries like healthcare and food packaging, regulatory standards may dictate specific surface finishes for hygiene and safety reasons.
Achieving Mold Textures
Creating mold textures involves various techniques and considerations –
- Chemical Etching: This method uses a chemical process to create microstructures on the mold surface, resulting in a textured finish. It is a precise and repeatable process that can achieve a wide range of textures.
- Electroforming: Electroforming involves depositing a layer of metal onto the mold’s surface, which can be textured as desired. It’s a versatile method but can be time-consuming and expensive.
- Laser Etching: High-precision lasers can create intricate textures on mold surfaces. This method is excellent for custom textures but may not be suitable for high-volume production.
- Blasting: Abrasive blasting techniques, such as sandblasting or bead blasting, can texture the mold’s surface. Blasting is a cost-effective method suitable for various textures.
- Textured Inserts: Mold inserts with pre-designed textures can be placed in the mold cavity to transfer the texture to the molded part. This method is efficient for large production runs.
- Secondary Operations: Some textures, like wood grain or leather grain, are added to the part after molding through secondary processes like hot stamping or pad printing.
Application of Mold Textures
Key points about the applications of mold textures in a step-wise and concise manner –
Step 1: Consumer Electronics
- Mold textures enhance the aesthetics of consumer electronics.
- It’s used for high-gloss finishes on smartphone casings and matte textures on keyboards.
Step 2: Automotive Industry
- Mold textures reduce glare and improve grip on car interiors.
- Wood grain and leather grain textures create a premium feel.
Step 3: Medical Devices
- Mold textures enhance the grip on surgical instruments.
- It provides tactile feedback on medical equipment.
Step 4: Cosmetics Packaging
- Mold textures add fine details and patterns to cosmetic packaging.
- It makes products stand out on shelves and reinforces brand identity.
Step 5: Aerospace Industry
- Mold textures contribute to lightweight components with specific surface characteristics.
- This enhances fuel efficiency and overall performance.
Step 6: Architectural and Decorative Products
- Mold textures replicate the appearance of natural materials like stone, wood, or marble.
- It’s used in tiles, decorative panels, and garden ornaments.
Step 7: Custom Products
- Mold textures offer flexibility for unique designs and branding.
- Custom textures or logos can be incorporated to distinguish products.
Step 8: Tool and Equipment Handles
- Ribbed or knurled textures improve user comfort and grip on handles.
- This is essential for tools and equipment.
Step 9: Food and Beverage Packaging
- Mold textures enhance user experience in packaging.
- It can improve grip on bottle caps or food containers.
Step 10: Toys and Recreational Products
- Mold texturing adds unique textures and designs to products.
- It enhances safety and user experience in toys and recreational items.
Pros & Cons
Mold texturing is a vital component of the injection molding process that involves creating specific surface finishes or textures on the mold cavity. These textures are then replicated on the molded plastic parts. While mold texturing can significantly impact the appearance, functionality, and quality of the final product, it also has its own set of advantages and disadvantages. In this article, we’ll explore the pros and cons of mold texturing to help you understand when and why it’s a valuable technique and when it might have limitations.
Pros of Mold Texturing
1. Aesthetic Enhancement
Mold texturing allows manufacturers to create a wide range of surface finishes, from high-gloss to matte, leather grain to wood grain, and more. These textures enhance the visual appeal of plastic products, making them more attractive to consumers. For industries like consumer electronics and automotive, where aesthetics matter, mold texturing is invaluable.
2. Hiding Imperfections
Mold textures can effectively hide minor imperfections and defects that may occur during the injection moldings process, such as flow lines, weld lines, or ejector pin marks. This can lead to a higher-quality finished product with fewer visible flaws.
3. Functional Characteristics
Textured surfaces can serve functional purposes. For example, textures can improve grip on handles, reduce friction on moving parts, or control light diffusion in display screens. These functional benefits make mold texturing essential in various industries, including manufacturing, automotive, and consumer goods.
4. Branding and Customization
Mold textures can be used to incorporate logos, brand names, or unique designs directly onto the product’s surface. This not only reinforces brand identity but also provides customization options to cater to specific customer preferences.
5. Consistency
When done correctly, mold textures ensure consistency in the appearance and quality of molded parts. This is particularly crucial for industries where uniformity is essential, such as automotive and electronics.
Cons of Mold Texturing
1. Cost
One of the primary drawbacks of mold texturing is the added cost. Creating textured molds, especially those with intricate or custom designs, can be expensive. The cost includes specialized mold inserts, equipment, and skilled labor.
2. Increased Lead Time
Mold texturing can extend the lead time of the injection molding process. The design, fabrication, and integration of textured molds take time, potentially delaying product delivery in time-sensitive industries.
3. Limited Design Complexity
Mold texturing has limitations in achieving highly complex or three-dimensional designs. Some textures may not be suitable for certain materials or may require secondary processes, which can add complexity and cost to production.
4. Maintenance
Textured molds may require more frequent maintenance and cleaning than smooth molds. Over time, wear and tear on the mold texture can impact the quality of the textured finish, necessitating maintenance or replacement.
5. Material Compatibility
Not all plastic materials are suitable for all types of mold texturing. Some materials may not hold the texture well, or the texturing process may affect the material’s properties, such as mechanical strength or clarity. Careful material selection is crucial.
Conclusion

Mold textures play a vital role in injection molding, influencing both the aesthetics and functionality of the final product. Choosing the right texture involves careful consideration of factors like product functionality, aesthetics, material selection, manufacturability, cost, and regulatory requirements.
Understanding the various mold texturing techniques, from chemical etching to laser etching and textured inserts, empowers manufacturers to create plastic parts that meet both technical and design specifications. Whether it’s a high-gloss finish for a smartphone cover or a wood grain texture for a piece of furniture, mold textures are an essential element in the world of injection molding, ensuring that form and function come together seamlessly in the products we use every day.
FAQ’s
How is texture added to mold?
Here’s a step-by-step explanation of how texture is added to a mold –
Step 1: Design the Texture
Start by designing the desired texture that you want to add to the mold. This can include patterns, shapes, or specific surface finishes.
Step 2: Create the Mold Base
Build the base mold structure according to the shape and size of the final product. This mold typically consists of two halves that come together during the molding process.
Step 3: Texture Creation
Depending on the desired texture and complexity, there are various methods to create it:
CNC Machining: Use computer-controlled machines to precisely carve the texture onto the mold’s surface.
Electro Discharge Machining (EDM): Employ electrical discharges to erode material from the mold’s surface, creating fine details.
Chemical Etching: Use chemicals to selectively remove material from the mold surface to create textures.
Laser Engraving: Use a focused laser beam to remove material and create intricate textures.
Step 4: Finish and Polish
After creating the texture, the mold’s surface may require finishing and polishing to ensure that it’s smooth and uniform.
Step 5: Integrate Texture into Mold
Incorporate the textured mold components (often inserts) into the mold base. These textured components will create the desired texture on the final product’s surface.
Step 6: Injection Molding
Load the mold into the injection molding machine.
Step 7: Injection Process
Inject molten plastic material into the mold under high pressure.
Step 8: Cooling and Solidification
During this phase, the texture is transferred from the mold’s surface to the plastic product.
Step 9: Demolding
Separate the mold halves and remove the textured plastic product from the mold.
Step 10: Quality Inspection
Inspect the finished product to ensure that the desired texture has been accurately replicated.
Step 11: Repeat as Necessary
Depending on production requirements, you can repeat this process to create multiple textured parts.
What is the texture of the mold?
The texture of a mold refers to the specific surface finish or pattern applied to the interior surface of the mold cavity. This texture is then transferred to the molded plastic part during the injection molding. Here’s an explanation of mold texture in a step-wise manner:
Step 1: Design the Texture
The process begins with the design of the desired texture. This design can range from a simple pattern to a complex, detailed surface finish. The texture is typically created to serve a specific purpose, whether it’s for aesthetics, functionality, or both.
Step 2: Select the Texturing Method
Depending on the desired texture, select the appropriate method for creating it. Common methods include –
CNC Machining: Computer-controlled machines are used to carve the texture onto the mold’s surface with precision.
Electro Discharge Machining (EDM): Electrical discharges erode material from the mold’s surface to create fine details.
Chemical Etching: Chemicals are used to selectively remove material from the mold surface, creating textures.
Laser Engraving: A focused laser beam removes material, allowing for intricate textures.
Step 3: Prepare the Mold Surface
Before applying the texture, the mold’s surface may need preparation. This can involve cleaning, polishing, or other treatments to ensure a smooth and uniform base for the texture.
Step 4: Apply the Texture
Use the chosen texturing method to apply the designed texture to the mold’s interior surface. This may involve machining, etching, or laser engraving the texture onto the mold.
Step 5: Quality Check
After applying the texture, inspect the mold’s surface to ensure that the desired texture has been accurately replicated. This step is crucial to verify that the mold texture meets the design specifications.
Step 6: Integrate the Textured Mold Components
Incorporate the textured components (often inserts) into the mold base. These textured components will create the desired texture on the final plastic product’s surface.
Step 7: Injection Molding
Load the mold into the injection molding machine.
Step 8: Injection Process
Inject molten plastic material into the mold under high pressure.
Step 9: Cooling and Solidification
During this phase, the texture is transferred from the mold’s surface to the plastic product.
Step 10: Demolding
Separate the mold halves and remove the textured plastic product from the mold.
Step 11: Final Inspection
Inspect the finished product to ensure that the texture has been accurately replicated. Verify that the texture meets the desired quality and functionality standards.
Step 12: Repeat as Necessary
Depending on production requirements, repeat the process to create multiple textured parts.
What creates texture?
Creating mold textures in a mold involves adding specific surface patterns or finishes to the mold’s cavity, which will then be replicated on the molded plastic parts. Here’s a step-wise explanation of how texture is created in a mold:
Step 1: Design the Texture
Begin by designing the desired texture, considering its purpose, aesthetics, and functionality.
Step 2: Select a Texturing Method
Choose the appropriate method for creating the texture based on its complexity and requirements. Common methods include CNC machining, EDM, chemical etching, and laser engraving.
Step 3: Prepare the Mold Surface
Ensure the mold’s interior surface is clean and smooth before applying the texture. This may involve cleaning, polishing, or other surface treatments.
Step 4: Apply the Texture
Use the chosen texturing method to apply the designed texture to the mold’s interior surface. This can involve machining, etching, or engraving to create the desired pattern or finish.
Step 5: Quality Check
Inspect the mold’s surface to ensure the applied texture meets the design specifications and quality standards.
Step 6: Integrate Textured Components
Incorporate textured components or inserts into the mold base, which will transfer the texture onto the plastic part during molding.
Step 7: Injection Molding
Load the mold into the injection molding machine.
Step 8: Injection Process
Inject molten plastic material into the mold under high pressure.
Step 9: Cooling and Solidification
During this phase, the texture is transferred from the mold’s surface to the plastic product.
Step 10: Demolding
Separate the mold halves and remove the textured plastic product from the mold.
Step 11: Final Inspection
Inspect the finished product to ensure that the texture has been accurately replicated and meets the desired quality and functionality standards.
Step 12: Repeat as Necessary
Depending on production requirements, repeat the process to create multiple textured parts.
In summary, creating mold textures in a mold involves designing, applying, and transferring the desired surface finish or pattern onto the plastic parts during the injection molding process. The chosen texturing method, surface preparation, and quality checks are critical steps in achieving the desired results.
What are the different grades of mold finish?

Mold finish, also known as surface finish or texture, refers to the quality and smoothness of the surface on the cavity side of an injection mold. These finishes range from very smooth to intentionally textured, and they serve various purposes in the injection molding process. The different grades of mold finish are categorized based on their smoothness and texture, with each grade having specific applications. Here are some common grades of mold finish –
SPI Finish Grades (Society of the Plastics Industry):
The SPI offers a standardized system for categorizing mold finishes, ranging from Grade A1 (highly polished) to Grade D3 (rough).
Grade A: This is a highly polished finish, suitable for applications where an exceptionally smooth and glossy surface is required, such as optical components and high-end consumer products.
Grade B: This finish is considered semi-polished and is suitable for products where a good aesthetic appearance is needed but not as critical as Grade A.
Grade C: Often referred to as a matte finish, Grade C is used when aesthetics are less important, and functionality is the primary concern.
Grade D: This is a rough finish and is typically used for parts where surface appearance is unimportant, such as certain automotive components.
Diamond Finish:
Diamond finish molds undergo additional polishing steps to achieve an even higher level of smoothness. They are used for applications requiring an exceptionally reflective and flawless surface finish, like luxury packaging.
Textured Finish:
Textured finishes range from light to heavy and are used to add specific textures to the molded part. Examples include leather grain, wood grain, or stippling textures. These textures can improve grip, reduce glare, or enhance aesthetics depending on the application.
Bead Blast Finish:
This finish involves blasting the mold surface with fine glass beads to create a matte or satin-like finish. Bead blasting is often used in applications where a non-reflective surface is desired, such as certain automotive interior components.
Chemical Etching Finish:
Chemical etching is used to selectively remove material from the mold surface, creating precise textures or patterns. This technique is commonly used for creating fine details on molds for consumer electronics and decorative products.
Electro Discharge Machining (EDM) Finish:
EDM can be used to create fine textures or patterns on the mold surface with high precision. It’s often employed for molds that require intricate and complex textures.
Custom Finishes:
In addition to standardized finish grades, manufacturers may develop custom finishes tailored to specific product requirements. These custom finishes can vary widely in texture and appearance, depending on the design intent.
Selecting the appropriate mold finish grade or texture depends on the product’s purpose, aesthetics, and functionality. It’s crucial to match the finish to the specific requirements of the final molded part to achieve the desired results.

Your article helped me a lot, is there any more related content? Thanks!